An eInk display with Nerves & Elixir - Getting started with Inky
2019-07-07Underjord is an artisanal consultancy doing consulting in Elixir, Nerves with an accidental speciality in marketing and outreach. If you like the writing you should really try the pro version.
So I've been curious about what kinds of displays you can connect to the Pi-series single board computers for a while. I happened to accidentally order a few. Among others an eInk display. I ordered the PaPiRus ePaper. It ended up being dead on arrival and then out of stock so I received an Inky to replace it. Fair enough.
eInk, as you know, is cool because it doesn't need power to keep displaying whatever you made it display last. Also, it is quite readable in sunlight and a few other niceties that light-emitting displays lack.
Drawbacks? Terrible refresh rate. The Inky refreshes in seconds, actually quite a bunch of them. And it does an annoying blink-cycle and stuff. But it supports an additional color. Generally red or yellow so far. That is pretty neat.
So lets get you started with running this from under Nerves and Elixir.
What you need
Knowledge
- A working understanding of programming, preferrably functional programming.
- Some experience with the Elixir programming language probably helps. This is targeted to Nerves enthusiasts and people with an interest in Elixir.
Hardware
- An Inky display from Pimoroni. We've tested the Red PHAT because we've had those to play with. But we should be compatible with the WHAT too.
- A Raspberry Pi device. Our testing has been on Pi Zero W. It should work fine with whatever the Inky supports.
- SD-card reader for whatever SD-card you use with your Pi. A card you don't mind overwriting.
- Preferably a micro-USB-male to USB-male (type A) cable for gadget mode updates on a Pi 3A+ or Zero. Otherwise any network connection between your computer and Pi device should also be fine, wired or less so.
Software
- Nerves with Elixir and OTP, follow the Installation guide.
- A code editor (Visual Studio Code is a free one that's fine).
- A working terminal where you can do your mix command stuff for Elixir.
A basic Nerves example
We'll start by getting things running on Nerves and then work our way up.
Generating the app
To get a new project set up you can use this command. I think the --init-gadget flag might be the default now but I'm backwards compatible I guess. Say yes if it asks to download deps. Those are nice to have.
mix nerves.new eink --init-gadget
cd eink
export MIX_TARGET=rpi0
You need to set your MIX_TARGET-variable. It should match the type of Pi hardware you have. And it needs to be done again if you use a fresh new terminal.
To get going with this we want to add our dependency for our display. We edit our mix.exs to include this in the
deps, right under {:toolshed, "~> 0.2"}, or so is fine:
{:inky, "~> 1.0"}Fetch dependencies to get inky into your project. This will also pull in circuits_gpio and circuits_spi since that's how we talk to the device.
mix deps.getNext we add some code to actually get our code running and doings things. We will change the Eink.Application module to start with. Primarily we change the children functions.
defmodule Eink.Application do
    @target Mix.target()

    use Application

    def start(_type, _args) do
        opts = [strategy: :one_for_one, name: Eink.Supervisor]
        Supervisor.start_link(children(@target), opts)
    end

    def children(_target) do
        [
        {Eink.Display, nil}
        ]
    end
end
And we'll create a basic GenServer that will run our display for us:
defmodule Eink.Display do
	use GenServer

	def start_link(opts) do
	  GenServer.start_link(__MODULE__, nil, opts)
	end

	@impl true
	def init(_) do
	  {:ok, pid} = Inky.start_link(:phat, :red)

	  Inky.set_pixels(pid, fn x, y, _width, _height, _current ->
		# Delightful checkerboard
		x_odd = rem(x, 2) != 0
		y_odd = rem(y, 2) != 0

		case x_odd do
		  true ->
			case y_odd do
			  true -> :black
			  false -> :accent
			end

		  false ->
			case y_odd do
			  true -> :accent
			  false -> :white
			end
		end
	  end)

	  {:ok, nil}
	end
end
Perfect! Let's ship it!
Try it on the device
Pre-flight check for firmware
SSH-keys
To connect to the device over SSH after it is up and running you will need a working cryptographic key. Nerves does a
decent
job of trying to pick up your public key so if you check in config/config.exs and look for the
keys variable, you'll see that it will pick up ~/.ssh/id_rsa.pub and a few others
automatically. You can add yours if you don't use id_rsa.pub and you will be ready for SSH. Then you can skip down
to Networking/USB.
If you don't know anything about SSH and keys you can might want to read up on it. But for now you can move on by doing this:
ssh-keygen -t rsa -C "your_email@example.com" -f nervesThat will generate a the key (the sensitive key, treat it like a password in a file) with the filename
nerves and the public key (harmless) nerves.pub.
..
keys =
  [
    "./nerves.pub"
  ]
  |> Enum.filter(&File.exists?/1)
..
Networking/USB
Using a Pi Zero or a Pi 3 A+ and a decent USB-cable you can use the default configuration for nerves_init_gadget which is to do networking through the usb0 interface over USB gadget mode. This means you plug your Pi Zero in with the inner micro-USB port and it gets power from your machine while it also establishes a network connection. This connection can be used to push updated firmware which is incredibly convenient. An mdns domain is used to allow you a convenient way to connect (note: this will not resolve on Android).
By default you get this:
config :nerves_init_gadget,
	ifname: "usb0",
	address_method: :dhcpd,
	mdns_domain: "nerves.local",
	node_name: node_name,
	node_host: :mdns_domain
If you do not have a cable or have something like Pi 3 of the bigger variety you don't have USB Gadget mode. It's fine. We got you. The Nerves Init Gadget README covers the basic configurations variants. You can use Ethernet or WiFi without issue. A sample wifi config would look like this. Note, I include the SSID and PSK in the config, this is not a good idea for a real project. The proper way is covered in the nerves_network README. I simplify to avoid a confusing and an ever-branching guide.
config :nerves_init_gadget,
	ifname: "wlan0",
	address_method: :dhcp, # Note: not dhcpd, that's for the USB thing
	mdns_domain: "nerves.local",
	node_name: node_name,
	node_host: :mdns_domain

# Additionally, configure the wifi connection in nerves_network
config :nerves_network, :default,
	wlan0: [
	networks: [
		[
		ssid: "YourNetworkName", # Change this
		psk: "YourNetworkPass", # Change this
		key_mgmt: String.to_atom("WPA-PSK"),
		scan_ssid: 1 #if your WiFi setup as hidden
		]
	]
	],
	eth0: [
	ipv4_address_method: :dhcp
	]
Finally, if you need ethernet it is a minor edit to the usb0 default:
config :nerves_init_gadget,
	ifname: "eth0",
	address_method: :dhcp, # Note, not dhcpd
	mdns_domain: "nerves.local",
	node_name: node_name,
	node_host: :mdns_domain
With one of these approaches you should have a network once we get the firmware on the device. Let's do the ceremonial burning of an image to a hard medium and then we can just shuffle bits like the futuristic people we are.
Burning the initial firmware
So connect your card-reader, stick the SD-card you want to sacrifice to the hardware gods in there and run the following to burn it.
# Compiles your firmware, we will do this a lot.
mix firmware
# Burns it to the card, with some dialog options. Ideally, we do this once.
mix firmware.burn
This process is temporary, nerves_init_gadget should allow us to push firmware over the connection we configured. Let's try it. Put the SD card in your device, connect the device to power.
Wait for it.. Wait for it... It should start blinking... and bam! Hopefully you have very dense pattern of red, white and black on your screen. Otherwise you should still be able to connect to the device and get some logs about what is happening.
If using usb0 for
networking, use the inner port and connect it to your development computer through USB. The Pi 3 A+ probably needs
separate power, I haven't tried that.
If using WiFi or Ethernet you should just need power and possibly an actual ethernet cable.
Run ping nerves.local and you should see the device resolve and respond to ping. That should mean you
can connect. If you had your SSH in order you can just use ssh nerves.local. If you made your own
nerves.pub key to put in the config you connect with ssh -i nerves nerves.local to specify
the correct key. You should have an interactive elixir prompt (iex) in front of you.
To investigate any issue you can do what the prompt will inform you about an run: RingLogger.next
inside the device's iex and you'll have the latest logs. You can also do it to just verify things are working.
To close the session and return to your terminal, type exit and hit enter. If that is not working, hit
enter a few times and the type ~. which is some kind of magic evocation for SSH to murder the
connection.
Pushing firmware
Anytime you have changes you want to put on the device from now on you should just push them over the network. To do that nerves offers a script. To get the script in place you should run:
mix firmware.gen.scriptThis will create a script called upload.sh.
Next time you have changes to try on the device, just run this:
# Compile the firmware
mix firmware
# Upload the firmware and trigger a device reboot
./upload.sh
I keep a terminal up with ping nerves.local to see when the device stops responding (goes down for
reboot) and comes back up (can be connected to again). This is how I know when I can expect my changes to take
effect.
On the host
Lets get back to the code-base, the project and our development machine for some more useful things.
Briefly on mocking for hardware development
Well. Nerves makes pushing firmware very simple and straight-forward. However, when working on visual stuff or iterating quickly on some detail of your application it is still pretty inconvenient to have to wait for pushing and rebooting over and over again. For this reason and for testability it is very common that you as a developer build out mocks or alternate implementations of different sorts. This can allow tests to run without peripheral hardware (this is used in the Inky library for example). It can also allow you to iterate faster by having stubs and simulations of the hardware you lack while developing on the host environment. We wanted that for you. And for Inky.
The host dev library
In your mix.exs, add our development dependency:
..
{:inky_host_dev, "~> 1.0", targets: :host, only: :dev},
..
Now we need to do some plumbing just to get things in order for a separation of on-host development vs on-device
development. By default the nerves init gadget is configured in config.exs. But it doesn't make sense for a host
environment. So it isn't loaded there. So we shouldn't be configuring things that are not used. What we want is some
common configuration (maybe). And separate configuration depending on the environment. So most of the configuration
will move to a device-based configuration in config/device.exs and the host-based configuration will
be in config/host.exs. So these three pieces will make up our configuration, create the files as
needed:
use Mix.Config

targeting =
  case Mix.target() do
    :host -> :host
    _ -> :device
  end

import_config "#{targeting}.exs"use Mix.Config
config :inky,
hal_module: InkyHostDev.HALuse Mix.Config
config :nerves, :firmware, rootfs_overlay: "rootfs_overlay"
config :shoehorn,
init: [:nerves_runtime, :nerves_init_gadget],
app: Mix.Project.config()[:app]
config :logger, backends: [RingLogger]
# Note, make this match your working key-setup
keys =
[
"./nerves.pub"
]
|> Enum.filter(&File.exists?/1)
if keys == [],
do:
Mix.raise("""
No SSH public keys found in ~/.ssh. An ssh authorized key is needed to
log into the Nerves device and update firmware on it using ssh.
See your project's config.exs for this error message.
""")
config :nerves_firmware_ssh,
authorized_keys: Enum.map(keys, &File.read!/1)
node_name = if Mix.env() != :prod, do: "eink"
# Note: adapt to your configuration, see the networking section
config :nerves_init_gadget,
ifname: "usb0",
address_method: :dhcpd,
mdns_domain: "nerves.local",
node_name: node_name,
node_host: :mdns_domainWe also need a small code-change to respect the new Inky config. Where we start the Inky GenServer, we need add the optional configuration that will plug a new hardware abstraction into Inky:
..
	{:ok, pid} = Inky.start_link(:phat, :red, %{
		hal_mod: Application.get_env(:inky, :hal_module, Inky.RpiHAL)
	})
..
Now to get everything in order for host development:
# Set the mix target, this will change our config/config.exs targeting variable
export MIX_TARGET=host
# Get the host only deps
mix deps.get
And to run it:
mix run --no-halt
# OR
iex -S mix
You should see a small window with a similar pattern to what is probably still being displayed on your eInk display. This allows you to do the same things the Inky can do, simulated using the native Erlang wxWidgets libraries. A neat toy for developers.
The good stuff - Using Scenic to render text & images
The Inky library only allows you to push pixels to the device, it doesn't know anything about text, images, geometric shapes or any of that interesting stuff. The Python library uses the Python imaging libraries to allow images, I haven't checked how they do text really. We use the Scenic framework. Boyd has done hard work so I don't have to care about font rendering and I'm definitely going to leverage that.
We need the scenic driver for inky, which is a separate library since it isn't really needed to push pixels to the device and it also only works on the pi devices. Of course, on host you can use scenics glfw driver to render. Time to make some more changes to our stuff.
First, our dependencies. We can remote inky_host_dev, it doesn't work with the driver and scenic provides a perfectly good alternative. Aside from the normal nerves stuff our deps should be:
..
{:scenic, "~> 0.10"},
{:inky, "~> 1.0"},
{:scenic_driver_inky, "~> 1.0.0", targets: [:rpi, :rpi0, :rpi2, :rpi3, :rpi3a]},
{:scenic_driver_glfw, "~> 0.10", targets: :host},
..
A few config changes in different files:
use Mix.Config

# Note: We don't need the hal_module config anymore
config :eink, :viewport, %{
	name: :main_viewport,
	default_scene: {Eink.Scene.Main, nil},
	size: {212, 104}, # Match these to your inky display
	opts: [scale: 1.0],
	drivers: [
	  %{
		module: Scenic.Driver.Glfw
	  }
	]
}config :eink, :viewport, %{
name: :main_viewport,
default_scene: {Eink.Scene.Main, nil},
size: {212, 104}, # Note: Match these to your inky display
opts: [scale: 1.0],
drivers: [
%{
module: ScenicDriverInky,
opts: [
# Note: Match these to your Inky display
type: :phat,
accent: :red,
opts: %{
border: :black
}
]
}
]
}defmodule Eink.Application do
@target Mix.target()
use Application
def start(_type, _args) do
opts = [strategy: :one_for_one, name: Eink.Supervisor]
Supervisor.start_link(children(@target), opts)
end
def children(_target) do
main_viewport_config = Application.get_env(:eink, :viewport)
[
{Eink.Display, []},
{Scenic, viewports: [main_viewport_config]}
]
end
endAnd a new folder (optionally) and a new module file:
defmodule Eink.Scene.Main do
    use Scenic.Scene
    alias Scenic.Graph

    import Scenic.Primitives

    @graph Graph.build(font_size: 32, font: :roboto_mono, theme: :light)
           |> rectangle({212, 32}, fill: :red)
           |> rectangle({212, 64}, t: {0, 32}, fill: :white)
           |> rectangle({212, 8}, t: {0, 32 + 64}, fill: :red)

    def init(_, _) do
      state = %{
        graph: @graph
      }

      {:ok, state, push: @graph}
    end
end
Let's try it locally:
    export MIX_TARGET=host
    mix deps.get
    mix scenic.run
Some red, some white. We are making primitives happen! If you encounter the following error when trying to run it, there is a known issue with scenic 0.10:
sh: line 0: exec: /Users/lawik/projects/eink/_build/dev/lib/scenic_driver_glfw/priv/prod/scenic_driver_glfw:
    cannot execute: No such file or directory
16:43:30.983 [error] dirty close
Fix it with fire:
rm -rf _build/dev/lib/scenic_driver_glfw
mix scenic.run
With that done, let's try it on the device, again the dirty close issue above may show its head, so we will run with the MIX_ENV set to prod, which seems to help:
# Note: Adjust for your device target
export MIX_TARGET=rpi0
# Fixes an issue in scenic 0.10, shouldn't be necessary otherwise
export MIX_ENV=prod
mix deps.get
mix firmware
./upload.sh
After a brief look at the dark boot screen, with a chance to see the corner of a Raspberry Pi boot image it should refresh again to show the same geometries.
Rendering text
Scenic allows us to render text. We won't get perfect results because Scenic relies on NanoVG (a minimal C-library that does OpenGL stuff) and NanoVG doesn't have an option to disable anti-aliasing of text. So we can't get pixel-perfect representation. But we will get text, and we don't have to screw around with fonts. If you want faked half-tones we also have a dithering option in the driver. It looks funny but might help you. Let's change our code to have some text:
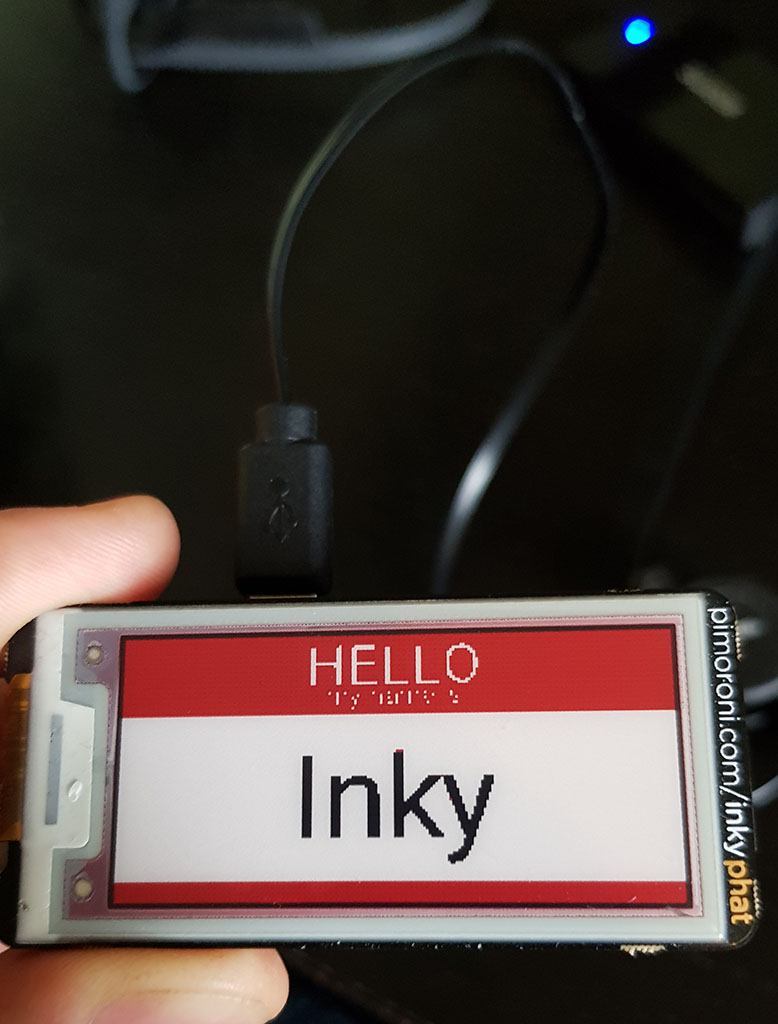
defmodule Eink.Scene.Main do
  use Scenic.Scene
  alias Scenic.Graph

  import Scenic.Primitives

  @font :roboto
  @font_size 20

  def init(_, _) do
    graph =
      Graph.build(font_size: @font_size, font: @font, theme: :light)
      |> rectangle({212, 32}, fill: :red)
      |> rectangle({212, 64}, t: {0, 32}, fill: :white)
      |> rectangle({212, 8}, t: {0, 32 + 64}, fill: :red)
      |> do_aligned_text("HELLO", :white, @font_size + 6, 212, 20)
      |> do_aligned_text("my name is", :white, @font_size - 8, 212, 28)
      |> do_aligned_text("Inky", :black, @font_size + 32, 212, 80)

    state = %{
      graph: graph
    }

    {:ok, state, push: graph}
  end

  defp do_aligned_text(graph, text, fill, font_size, width, vpos) do
    text(graph, text,
      font_size: font_size,
      fill: fill,
      translate: {width / 2, vpos},
      text_align: :center
    )
  end
end
Then mix the firmware and dot slash upload it, wait for the beautiful result. Okay, parts are somewhat unreadable, Retina it ain't. I'm sure you can improve it.
But this is as far as we go this time, old friend. We've been through a lot. You now have the power to do weird things with your Inky display using the glorious tooling of Nerves and the fanciness of Scenic. If you want to keep in touch after this perilous journey I'm available at lars@underjord.io.
My final code is available here if you need to check something or want to refer back.
Underjord is an artisanal consultancy doing consulting in Elixir, Nerves with an accidental speciality in marketing and outreach. If you like the writing you should really try the pro version.
Note: Or try the videos on the YouTube channel.